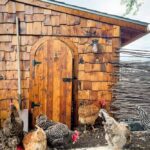
How to Build a Rounded Hobbit Door
Every good coop or shed deserves a little whimsy. Ours came in the form of a hobbit door and a round window—because why not?
Cost: 130
Equipment
- A large compass or a homemade one with a pencil and string
- Jigsaw
- Exterior wood sealer or finish for weatherproofing
Ingredients
- A sheet of plywood for the door base
- Cedar planks to face the door and match siding-optional
- Strap hinges
- Decorative iron handle or latch
- Trim boasrds for the door edge and round window
- 1 x2s or similar for door stops
Instructions
- Cutting the Circle: once you have everything traced and lined up, you can cut out your door and then your trim pieces. I used a jigsaw for all of it.
- Building your Hobbit- Round-Top Door: Clamp the planks, screw in a support on the top and bottom and add a brace, if needed. I sanded all my pieces down really good so the door can fit easily in and out of the door hole.
- Adding Trim: Attach the trim pieces to the door’s face and edges of the frame.
- Building Stops: Inside the doorway, attach thin boards (1x2s work well) around the frame. These act as “stops,” giving the round door something to close against and sealing out drafts. Cut the stops to follow the curve of your doorway—several shorter pieces joined together can make the bend.
- Attatching the Hinges: I took a brace piece and temporarily screwed it to either side of the frame, so I could have my hands to mount the hinges onto the framing of your coop, so the weight is supported. Also make sure there is good clearance below so the door can open and close easily.
- Handle, Latch & Weatherproofing: Finish your Hobbit Door with a decorative iron handle or latch. Seal all edges with an exterior finish or oil to keep the cedar from weathering too quickly. This is our new favorite way to seal and protect all of our outdoor wood projects- just like the Vikings did.
Notes
Comment your questions and thoughts below!