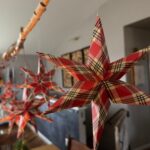
Wrapping Paper Stars
My newest installation in our paper star decor. These simple yet beutiful decorations can grace your house throughout the winter!
Cost: $5
Equipment
- Scissors
- Hot Glue
Ingredients
- Wrapping paper (I like to choose a pattern that allows us to keep the stars up through the winter!)
- Twine or Fishing Line
Instructions
- Cut your wrapping paper into 5 - 7 squares. The size and number depend on how large you want your star. For square size I go for about 4x4 inches.
- Lay your paper flat and rotate it so it looks like a diamond. Take the right corner and fold it over to meet the left corner. This diagonal fold will make a triangle
- Open the paper back up and lay it flat and rotate it so it looks like a diamond again. Grab the right corner and fold it into the middle line so it makes a small triangle shape. Repeat with the left corner. The two triangles will not reach the bottom of the paper, this is correct.
- Now direct your attention to the paper that has not been folded over yet at the bottom and fold it up into the triangle. Repeat step 3 but with this smaller part of the paper (fold the right and left top corners into the center line). Glue these smaller flaps down
- Repeat with the other squares
- Take all of your star points and press them down horizontally so that the smaller flaps become flat, not folded in.
- Take one star point and add hot glue to the top near the flat edge and continue to glue the points on top of each other - just by the flat top, not the entire point
- Unfold your star like an accordion and press it together. You can either glue these last pieces together or staple them - stapeling allows you to fold them up easier for storage
Notes
Leave pictures of your stars!