

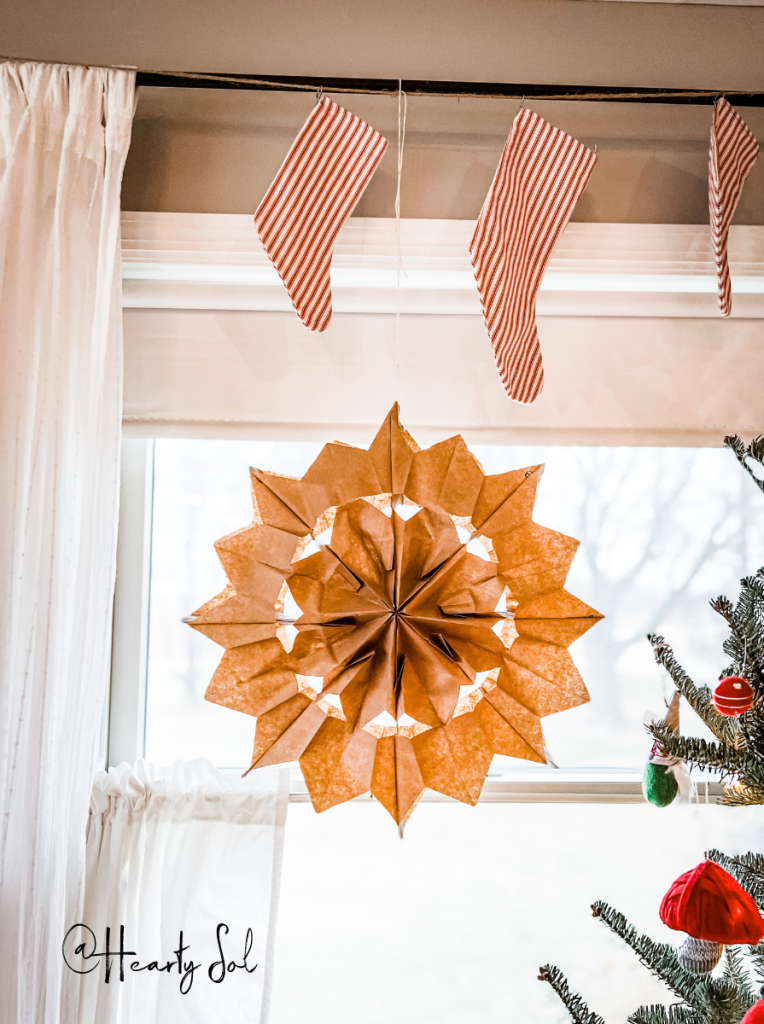
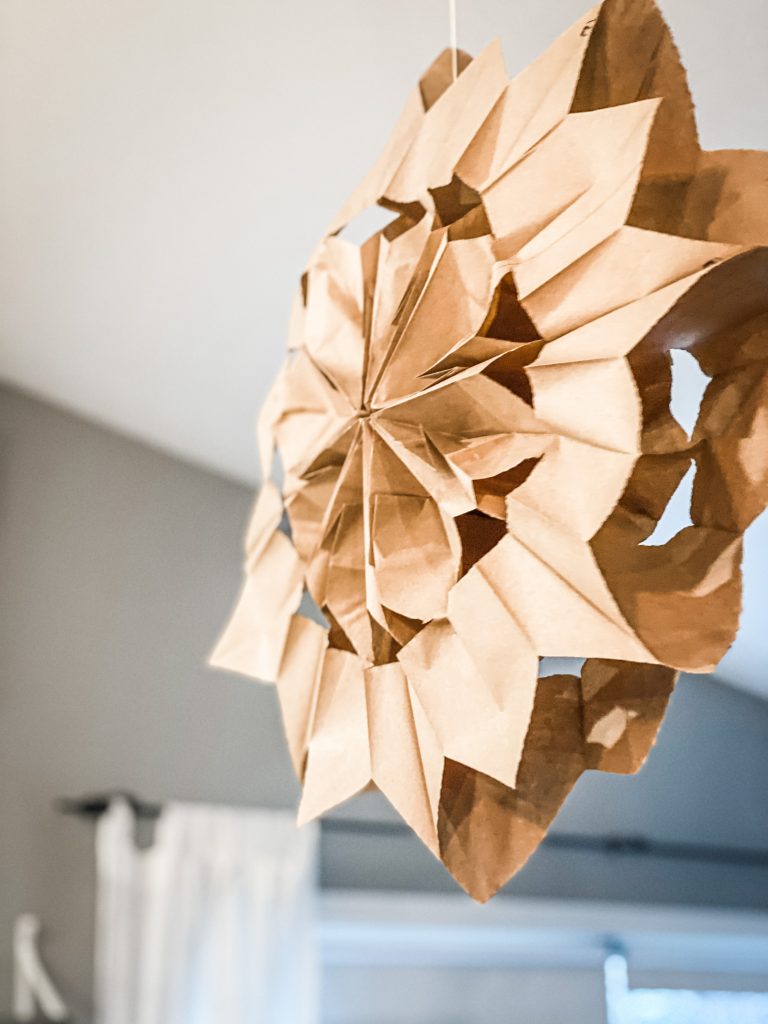
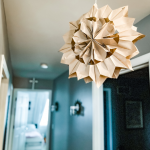
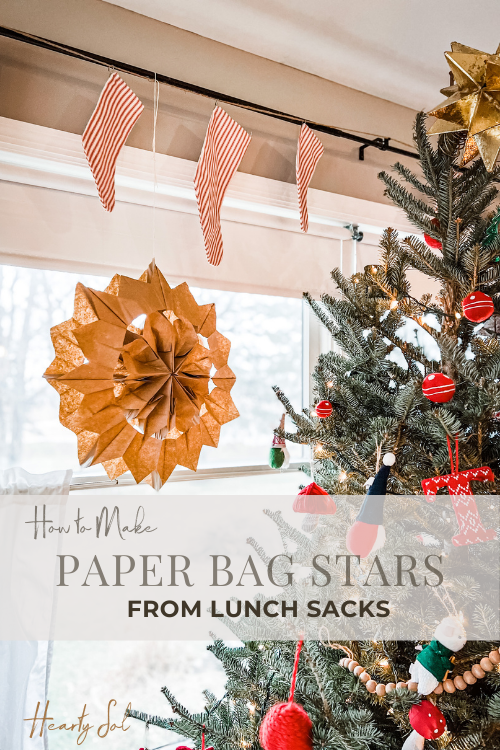
How to Make Easy Paper Bag Stars
These easy paper bag stars were a huge hit last year. In this tutorial I’ll show you how we make our fun paper bag starts!
Once a holiday hits and the kids are home, we love putzing with easy homemade decorations to make our home feel, really, like OUR home. Finding things we already have around the house eliminates our need to have to ‘go out’ to get materials.
Our little craft cubby has everything we need. Add a dash of childhood wonder and imagination and voila, we have simple and inexpensive decor!
Why You’ll Love making Paper Bag Stars
- This is a simple and inexpensive craft that even the littles can help with.
- Odds are you may have a few brown paper lunch sacks somewhere. Add a few colored paper bags to the mix for New Years or a birthday party!
- They are light and easy to hang using a simple 3M removable hook.
- Add cut out some triangles or other shapes from the bags and turn these stars into winter snowflakes!

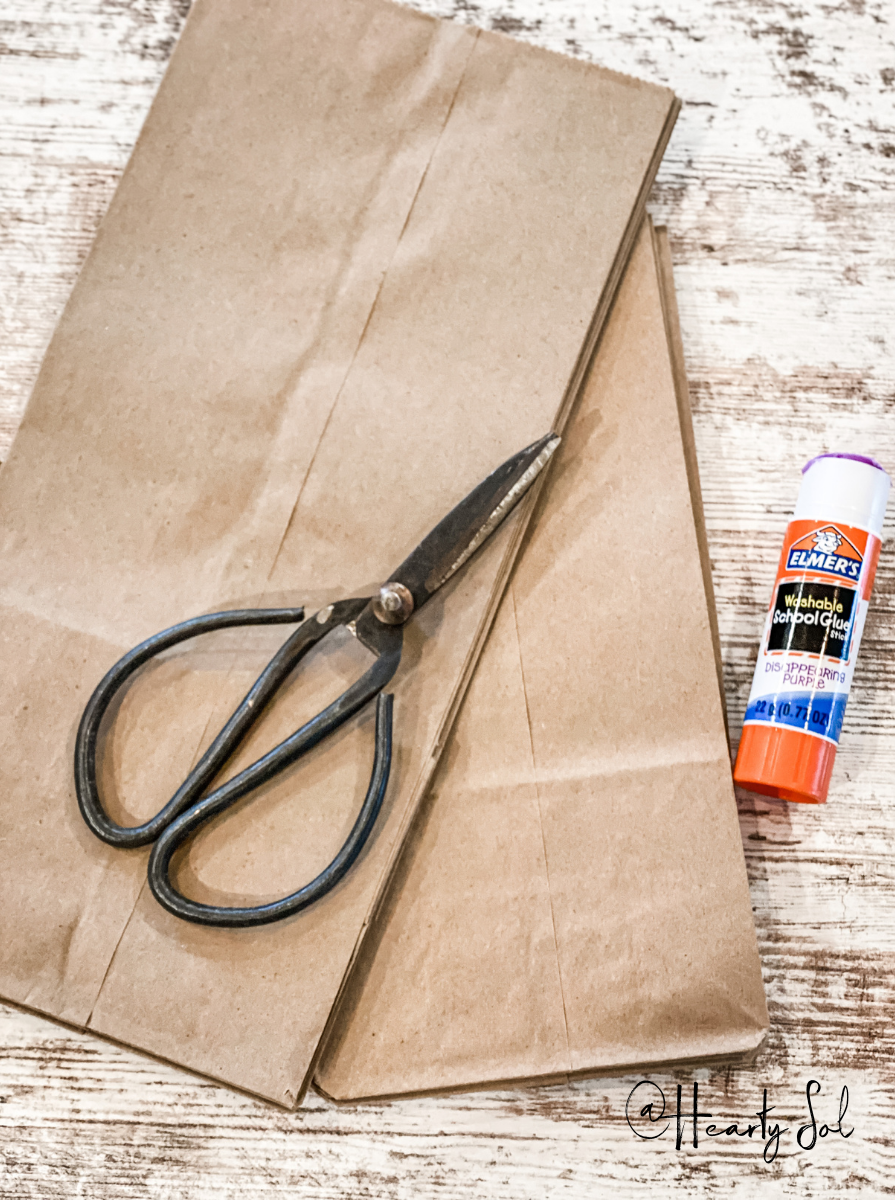
Materials you’ll need to make Paper Bag Stars
- 8 paper lunch bags (there are so many color choices but white, black and brown are our favorite)
- a Sharp Scissors
- Glue Gun and Sticks or a Large Glue Stick
- Fish line or thread for hanging (optional)
- Hole punch

How to Make Paper Bag Stars
Time needed: 10 minutes
Making Paper Bag Stars- The Tutorial
- Count out the Paper Bags
For standard-sized lunch bags, you’ll need to use 7-9 bags. The sweet spot for ours has been 8 or 9, so to make sure they can meet at the end without stressing the glue on the other bags. For smaller bags you will use 12-14 bags.

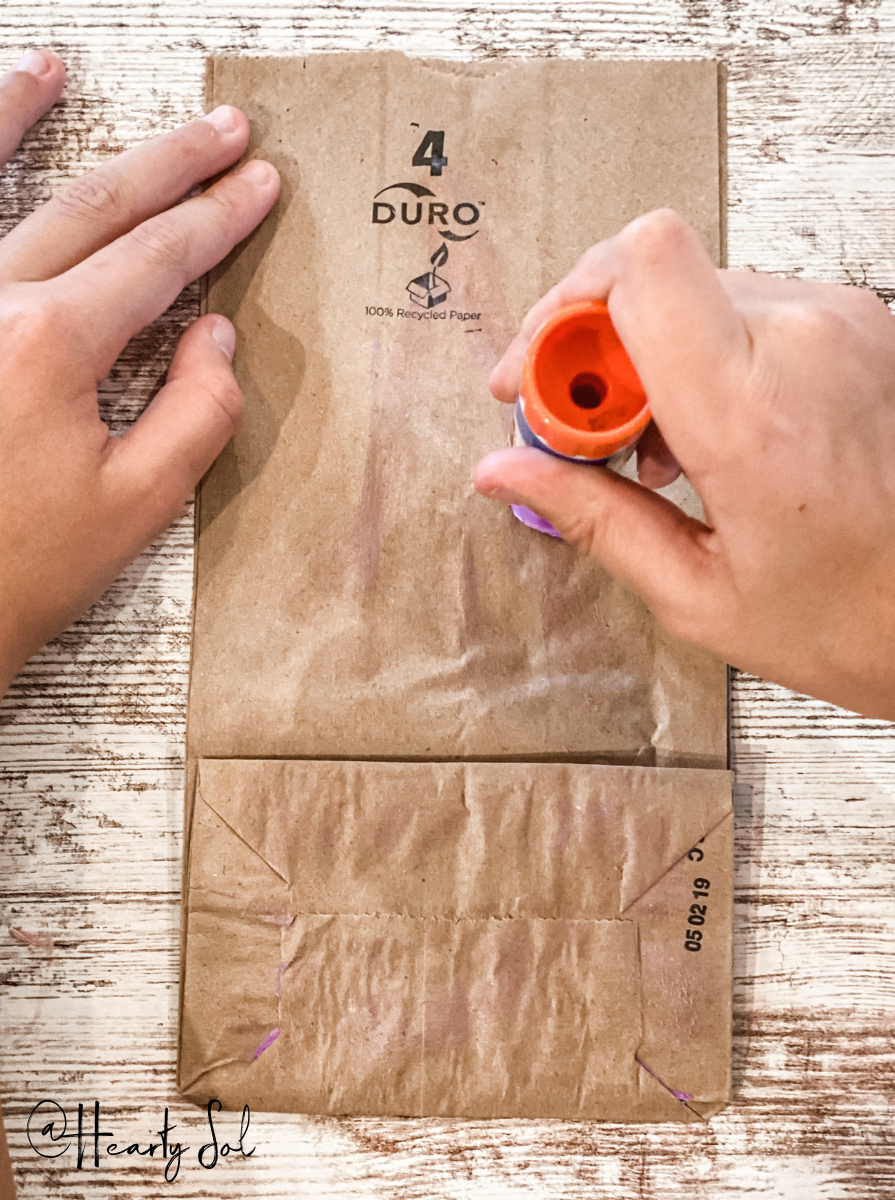
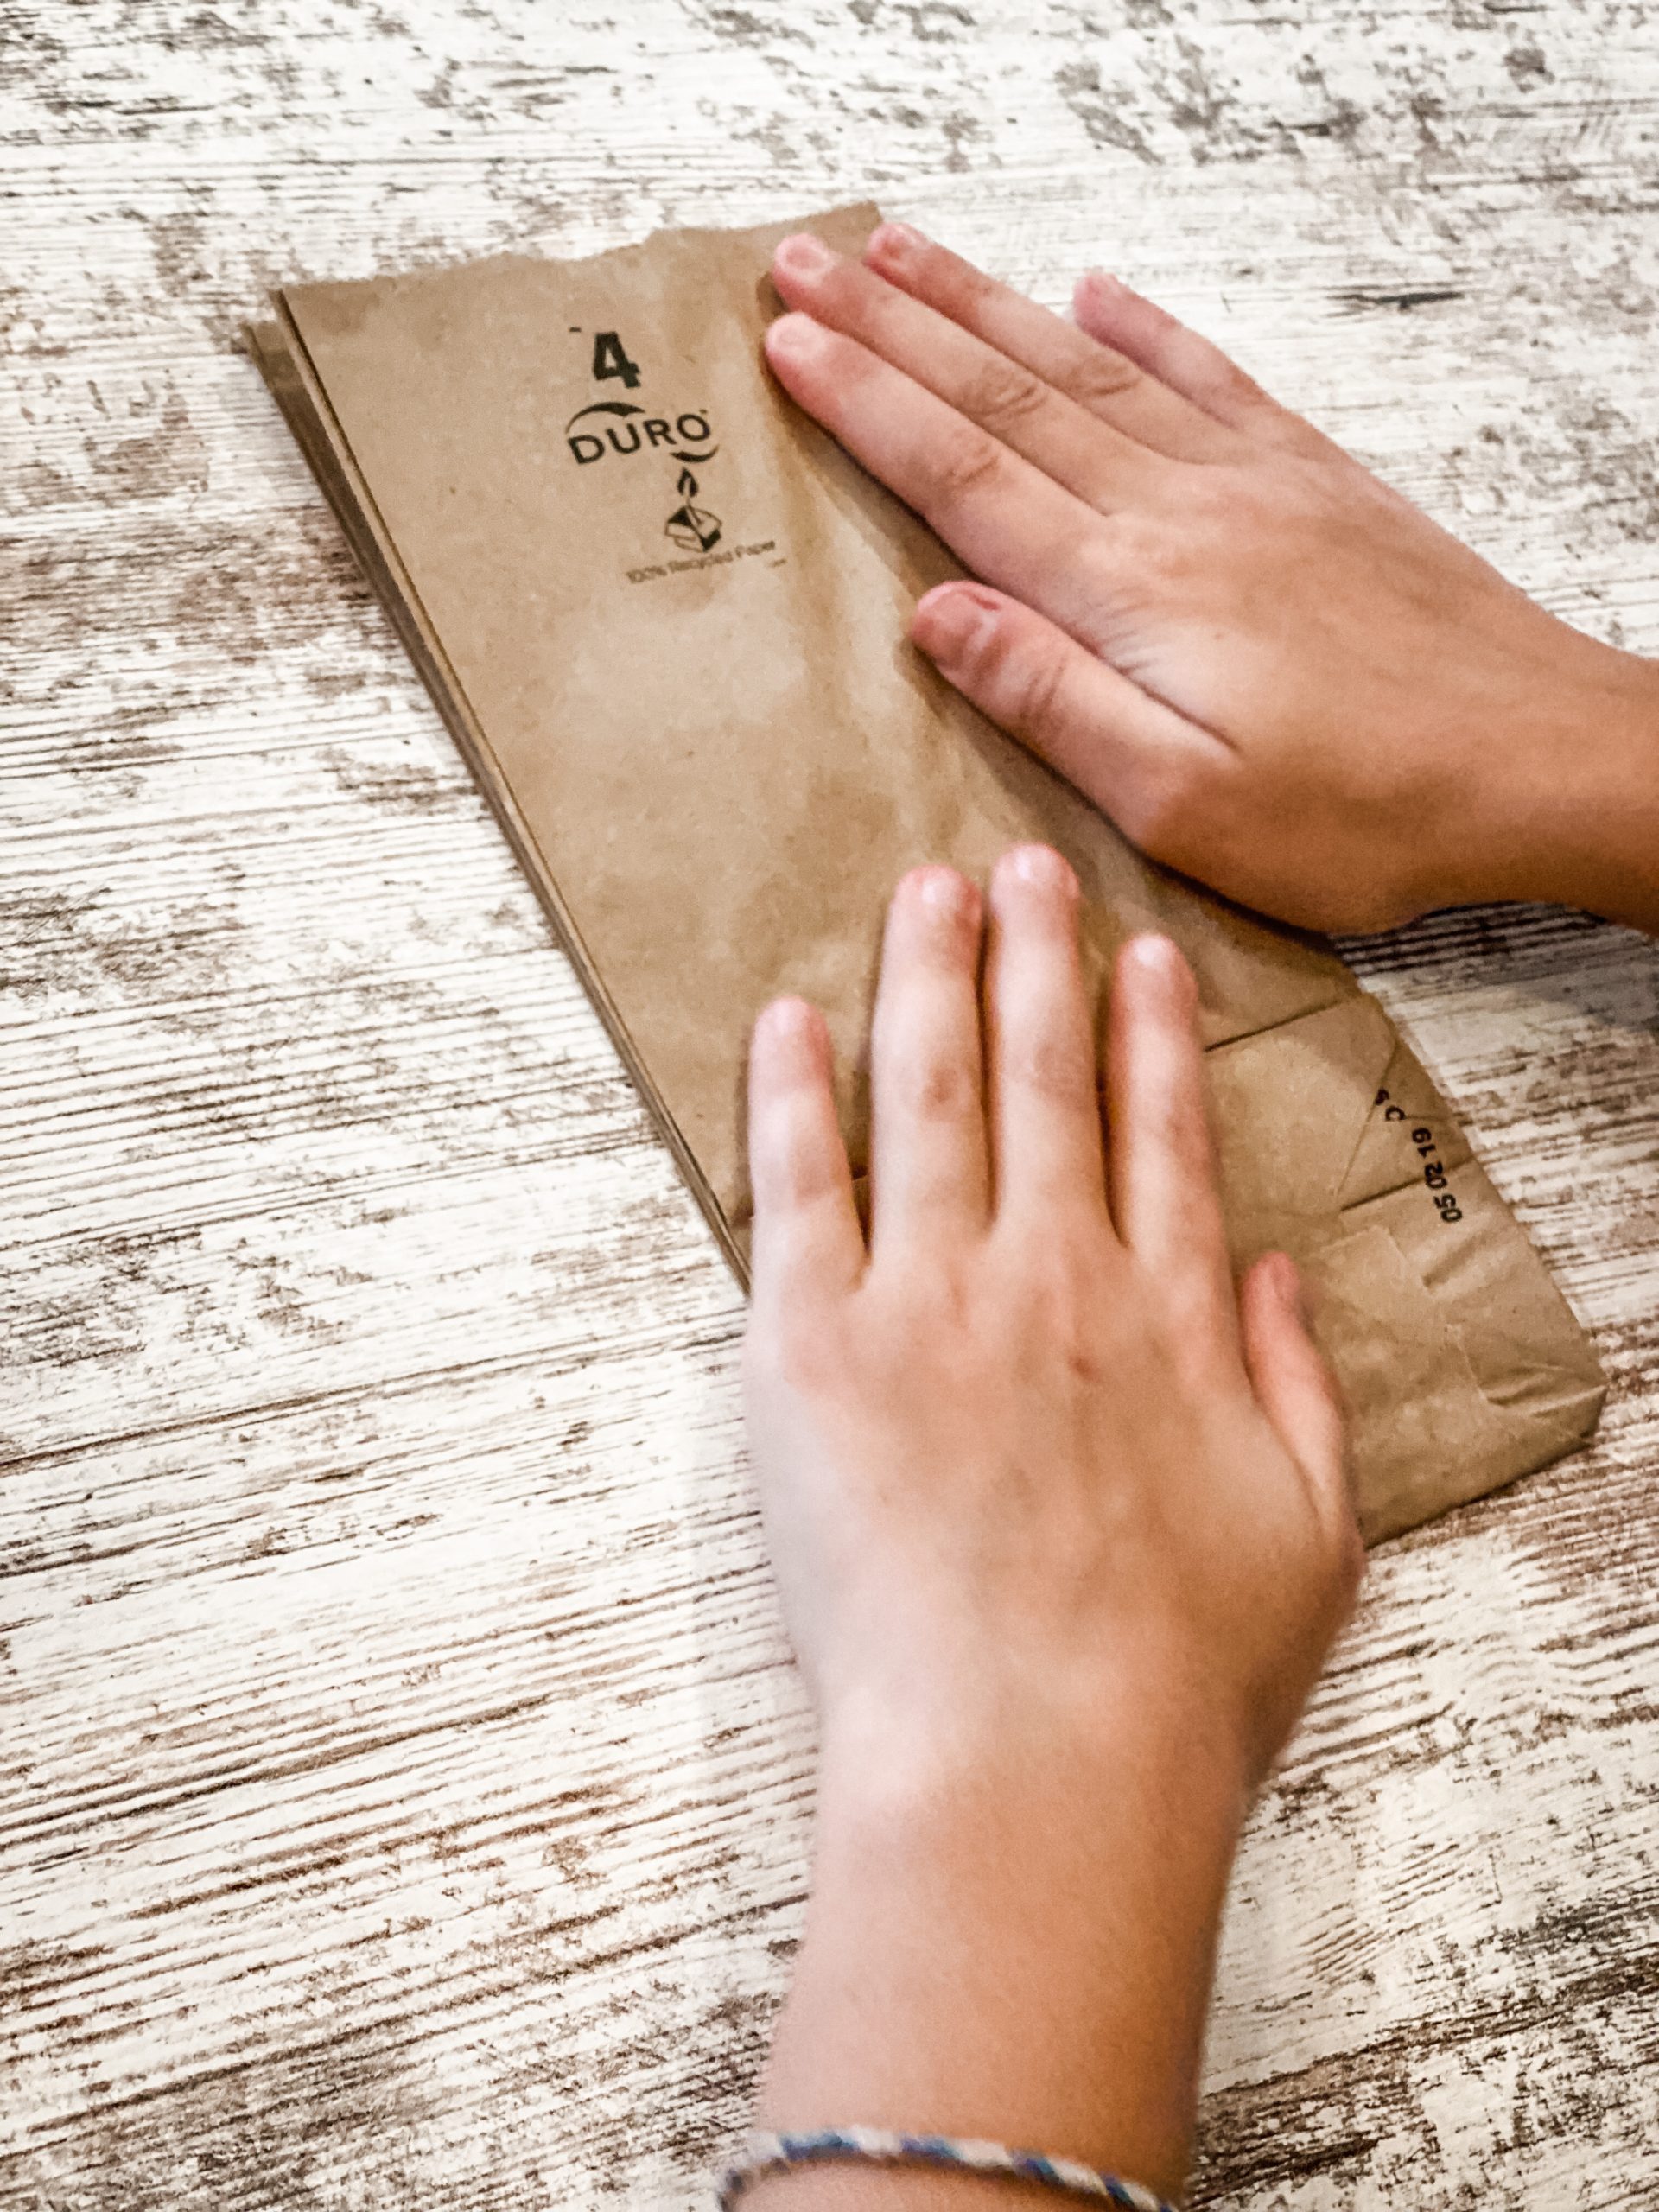
- Add Glue
Add glue to the back of each bag, along the bottom and up the center.
- Stack and Repeat
Stack another bag on top of your glue, facing the same directions, pressing it in place. Add glue to the top of this bag, just as you did with the first and repeat until you’ve use up all the bags you counted out.(7-9)

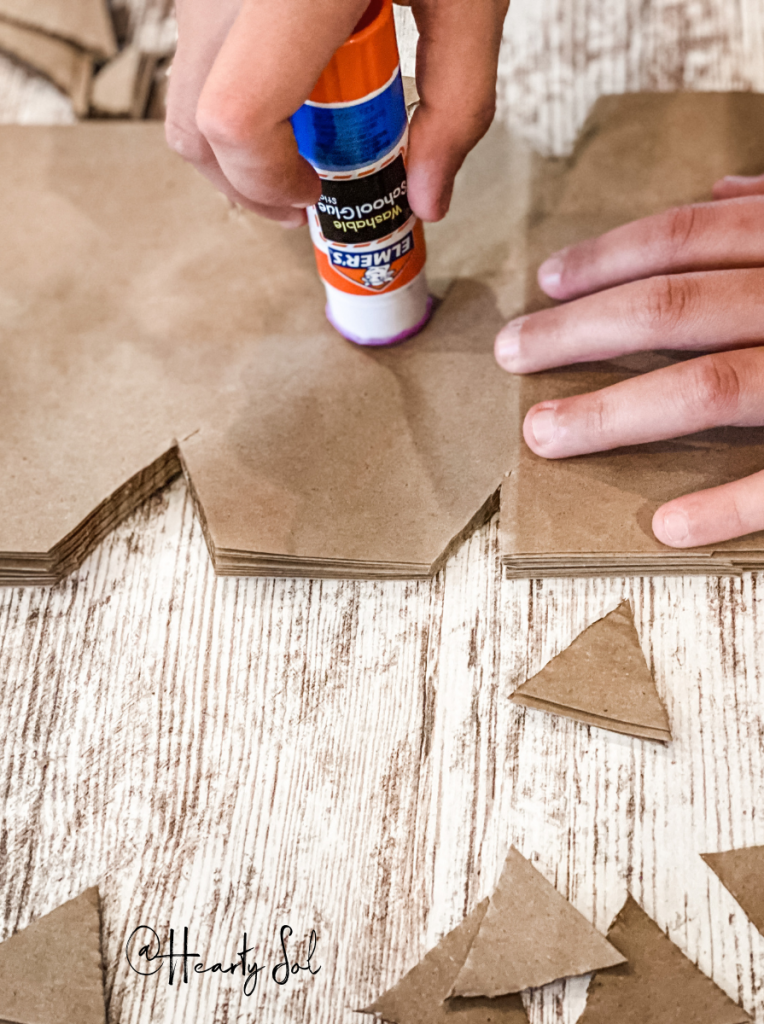
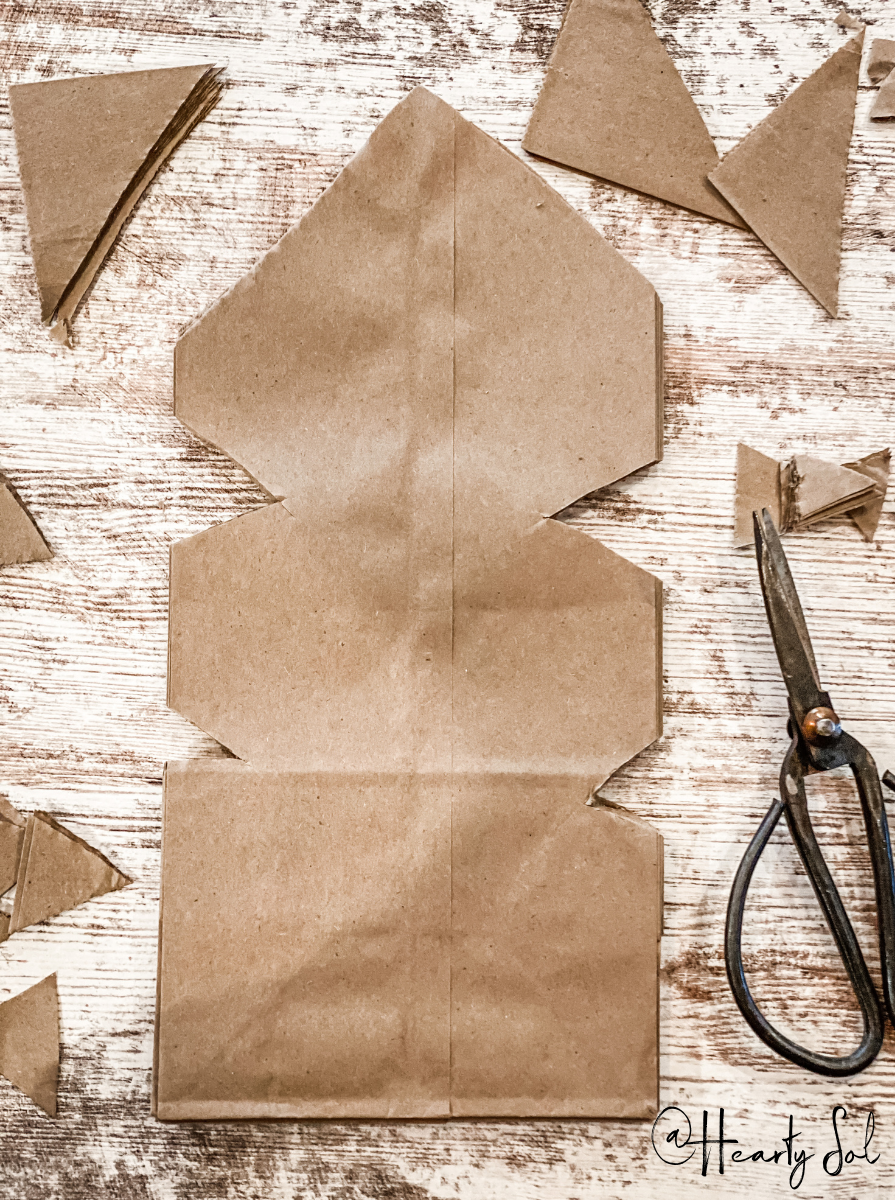
- Cut as desired
Once you have all your bags glued together, cut the top corners off, forming a point and get creative to make whatever shape you want. You may find a bit of cutting fatigue as you go along, so making 2 stacks of glued bags, cutting them out the same, then glueing them together can help with this.
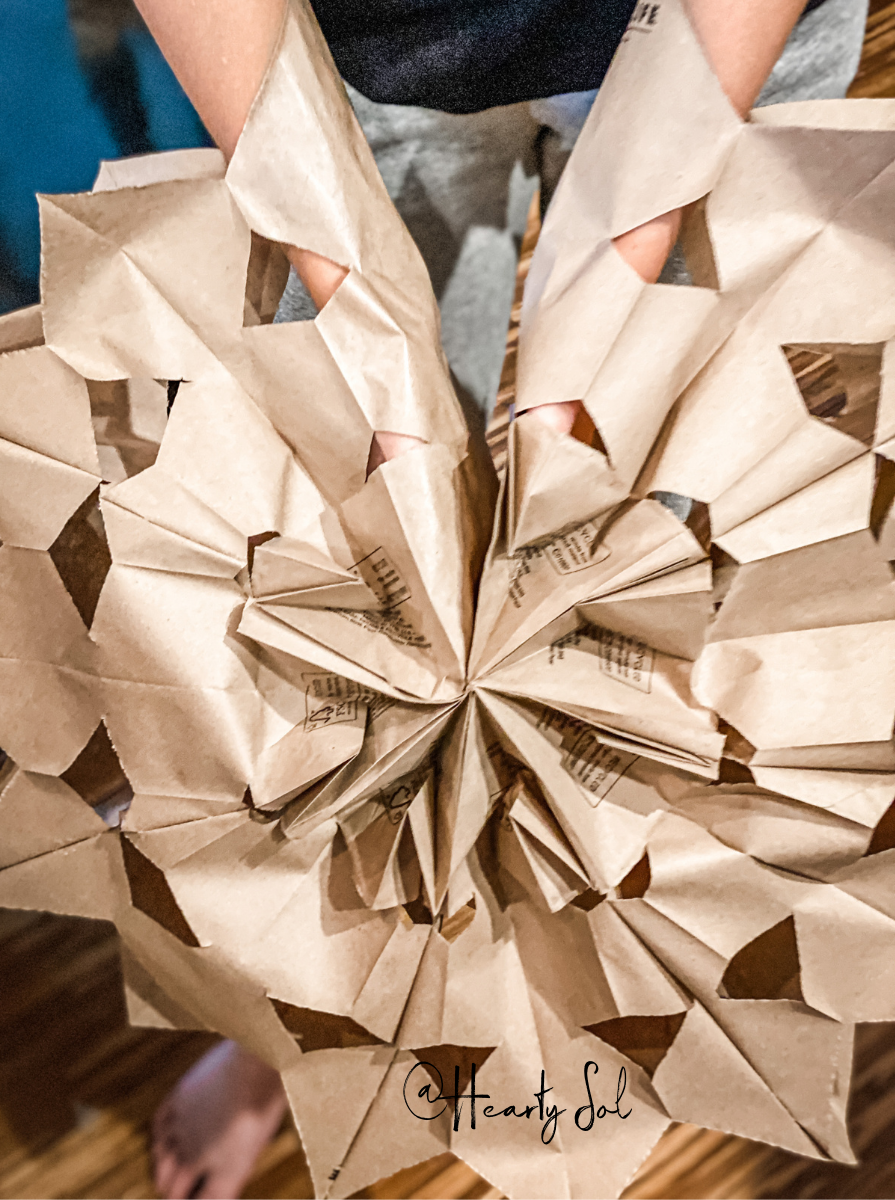
- Glue the last bag
Open the bags up to make sure they meet at the end, if it seems tight, add 1-2 more bags so not to break the glue seams. Hold the ends together for a good minute to make sure the seams will stay.
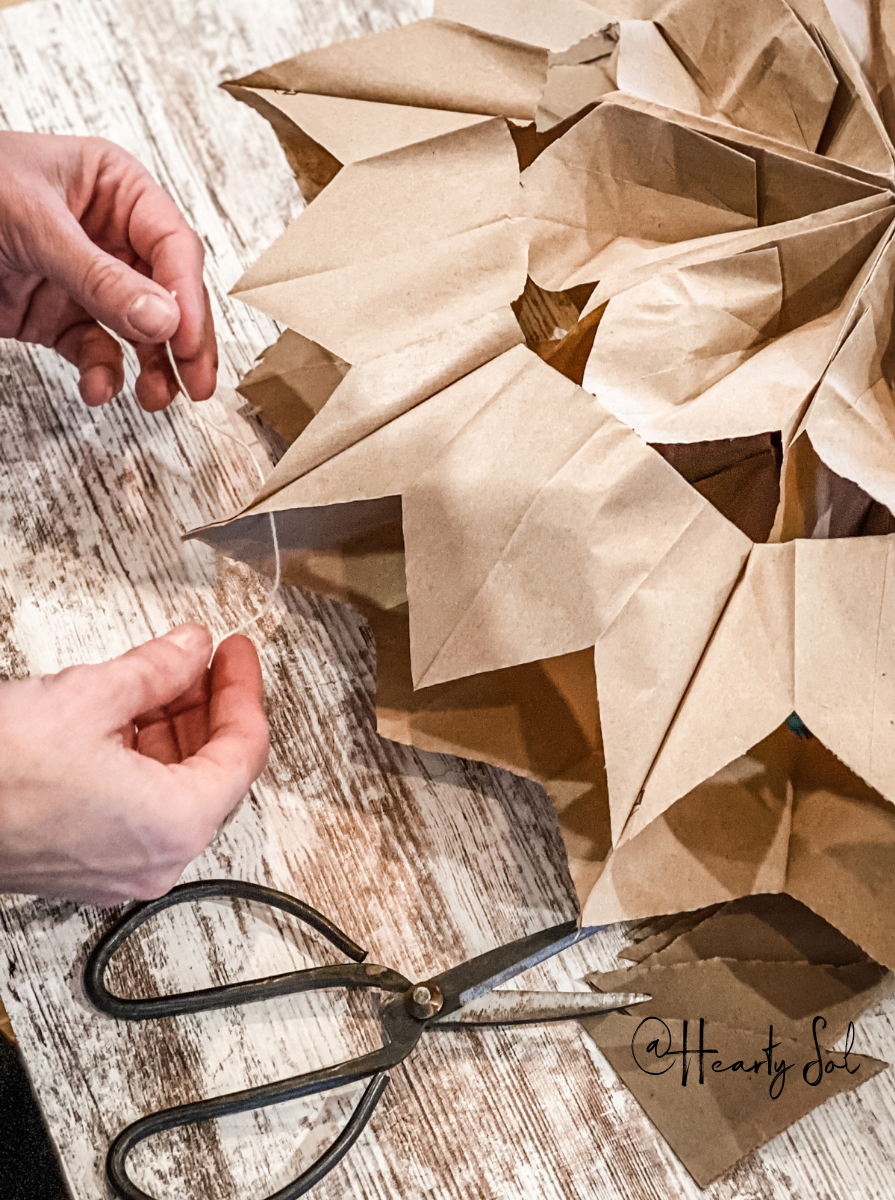
- String up
Punch a hold in the the last 2 bags that you glued together and add string to hang.

Questions People are asking about these Paper Bag Stars
Sure, you could with proper storage! I personally love not having to store these and they are made from paper, so easy to recycle and make new ones for next year.
Yup, we used 2 different sizes of lunch bags. I had a stock of paper bags that we used at our farmers market in a couple of different sizes. It seems the larger the paper bags were, the harder they become to cut through. So keep that in mind. The thinner the bag is, the better.
I have just the post for you, sweet hearty fan. Click here for our tutorial on how to dry oranges for decor.
Tips about making Paper Bag Stars
- Let the kids help with the glueing, but let an older kid or adult do the cutting. Cutting thought 8 bags can be a little tough.
- Make sure to face the bags all the same way when you are glueing them together or you may just create another kind of craft by accident ;).
- The last section of glue really needs some good holding and pressure. I hold this seem for at least 10-20 seconds so I know that the glue has held before I punch my hole in the top.
- If you are using a lot of bags or they are thicker, they can be really hard to cut through. We recommend making two stacks of glued bags, cutting as desired and then glueing the two stacks together.
Printable Instruction Card
Paper Bag Stars
Equipment
- Sharp Scissors
- Glue Gun and Sticks or a Large Glue Stick
- Hole punch
Ingredients
Instructions
- Count out the Paper Bags. For standard-sized lunch bags, you'll need to use 7-9 bags. The sweet spot for ours has been 8 or 9, so to make sure they can meet at the end without stressing the glue on the other bags. For smaller bags you will use 12-14 bags.
- Add Glue to the back of each bag, along the bottom and up the center.
- Stack and Repeat. Stack another bag on top of your glue, facing the same directions, pressing it in place. Add glue to the top of this bag, just as you did with the first and repeat until you've use up all the bags you counted out.
- Cut as desired. Once you have all your bags glued together, cut the top corners off, forming a point and get creative to make whatever shape you want. You may find a bit of cutting fatigue as you go along, so making 2 stacks of glued bags, cutting them out the same, then gluing them together can help with this.
- Glue the last bag. Open the bags up to make sure they meet at the end, if it seems tight, add 1-2 more bags so not to break the glue seams. Hold the ends together for a good minute to make sure the seams will stay.
- String up. Punch a hold in the the last 2 bags that you glued together and add string to hang.
Notes
Pin this for later!
- Teaching Kids the Art of Talking to People
- Luxembourg and Beyond | Citizenship + Travel Tips
- How We Built an Old-World Stone Trough Fountain (And What I Learned Along the Way)
- Grandma’s Rhubarb Crisp | Delightfully Tasty and Rooted in Tradition
- Fresh and Creamy Rhubarb Cooler made with Homemade Rhubarb Syrup

Affiliate Disclosure & Content Disclaimer
This post may contain affiliate links from a paid sponsor, Amazon or other program. When you use these links to make a purchase I earn a small commission at no extra cost to you. This allows me to continue creating the content that you love. The content in this article is created for information only and based on my research and/or opinion.
Emily T.


DAILY INSPIRATION ON THE GRAM @hearty.sol
it's hip to be square!
View comments
+ Leave a comment