

How to Naturally Dye your Easter Eggs
A tradition built on natural colors and even more vibrant memories. Come on in, let’s bring in natural colors of the rainbow and dye some Easter Eggs together!

A Colorful Family Tradition
These are the traditions that matter. The ones that plant a deeper understanding in my kids of who they are and where they came from. The ones that bring them tangible, vibrant joy. The ones they will carry on with their own families one day.
When I start my blogs with “as a kid in my grandma’s kitchen” or “when I was little” or “my mom would always…” as I often do, I’m calling back to a rich history of Luxembourgish, Swedish, German, and Norwegian roots. I am constantly inspired by the people and cultural traditions that have made me who I am today, especially when it comes to holidays.
The legacy that these pillars and traditions in my life have left deserve a spot in history. Something saved, documented, and a piece that our children can look back on and know that they were a part of it all, too.
- A favorite childhood activity
- How to get the Natural Rainbow Colors
- How to Naturally Dye your Easter Eggs
- More variations I’m curious about
- Video Tutorial
- FAQ’s
- Tips for beautifully dyed eggs
- Printable Instruction Card
- Pin for Later!
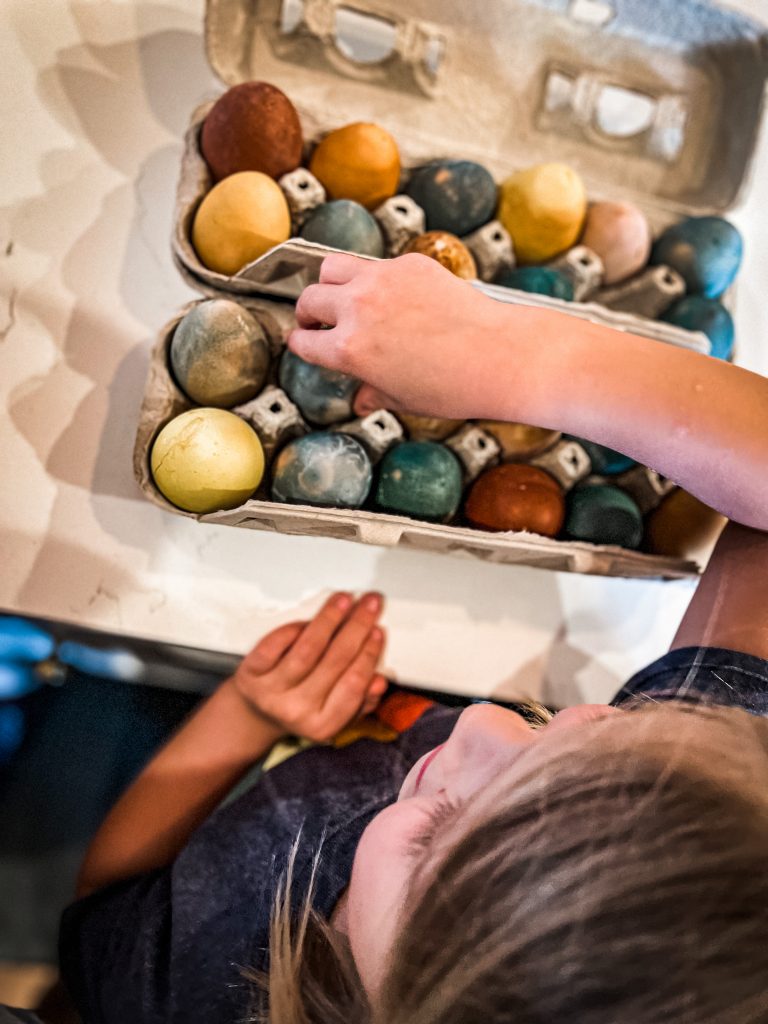
The beauty of this Easter tradition
Grandma lived through the Great Depression, and she had a wealth of knowledge when it came to living on a shoestring.
She could turn garbage into a master centerpiece! She could also turn her average colored chicken eggs into beautifully dyed Easter eggs, using what she had pulled out of the garden the season before.
I still remember racing our cousins up to the hay barn to search for those deep orange and brown Easter eggs with our little mismatched straw baskets. They were real hard-boiled eggs. Not the kind you break apart to expose a piece of candy and yet we still went wild for them!
There’s nothing better than channeling those times in grandma’s kitchen and sharing these memories with our kids. They love hearing stories from when I was little. They giggle when I tell them there wasn’t actually candy in them – although grandma made sure we all got a couple pieces.
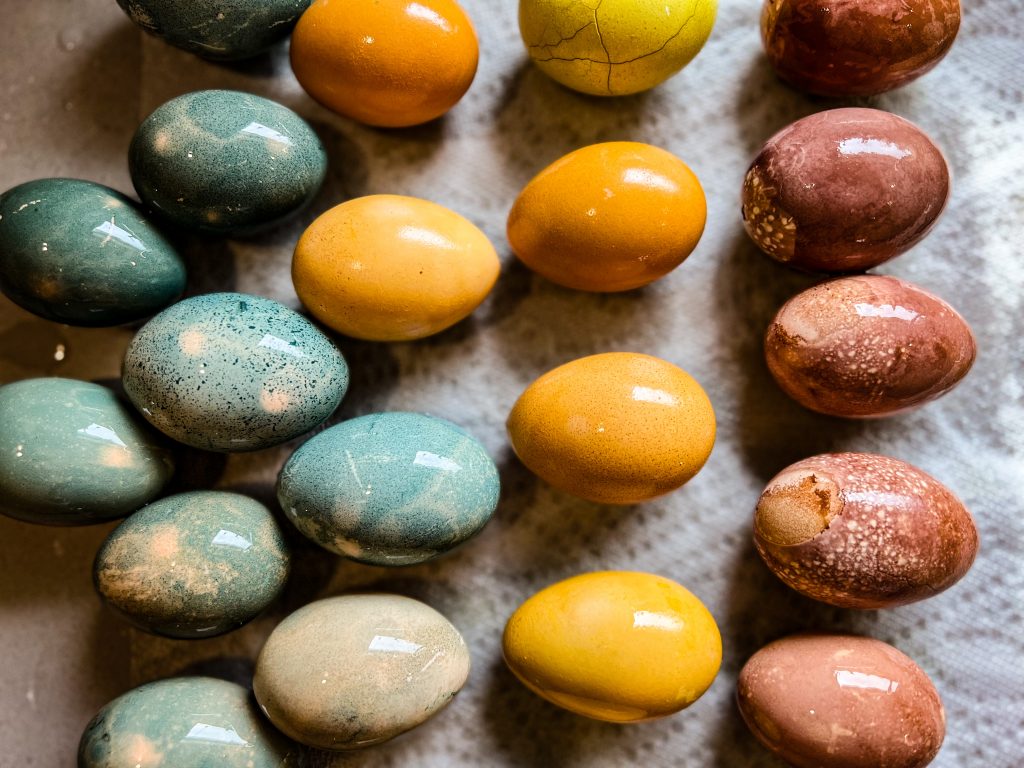
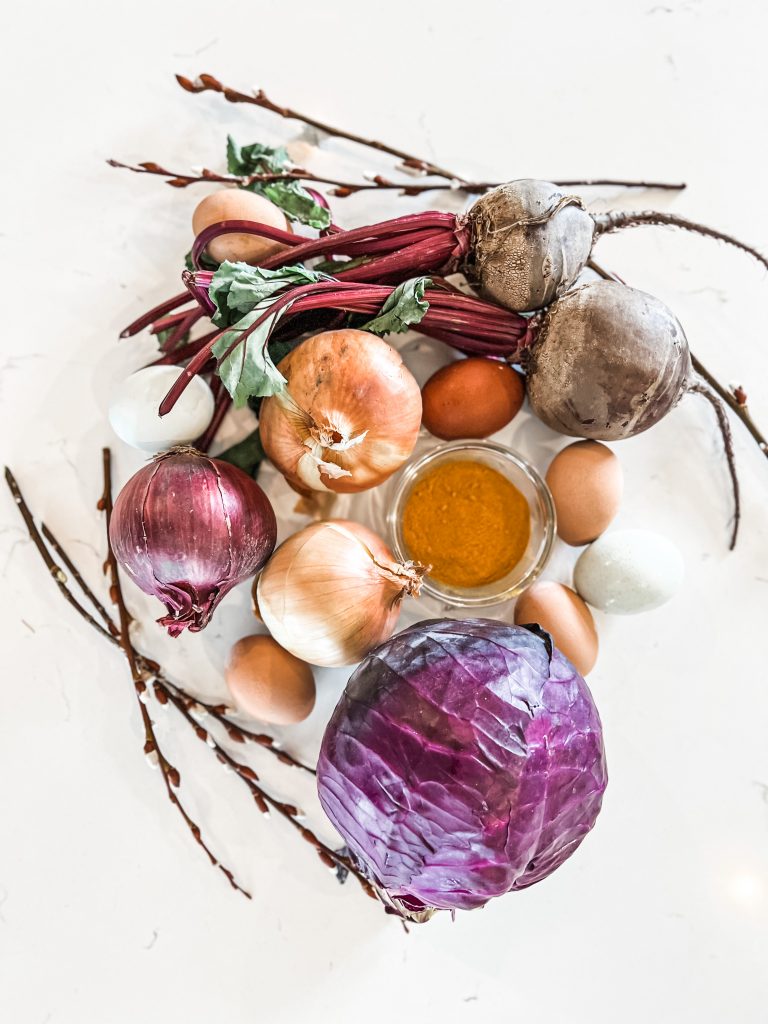
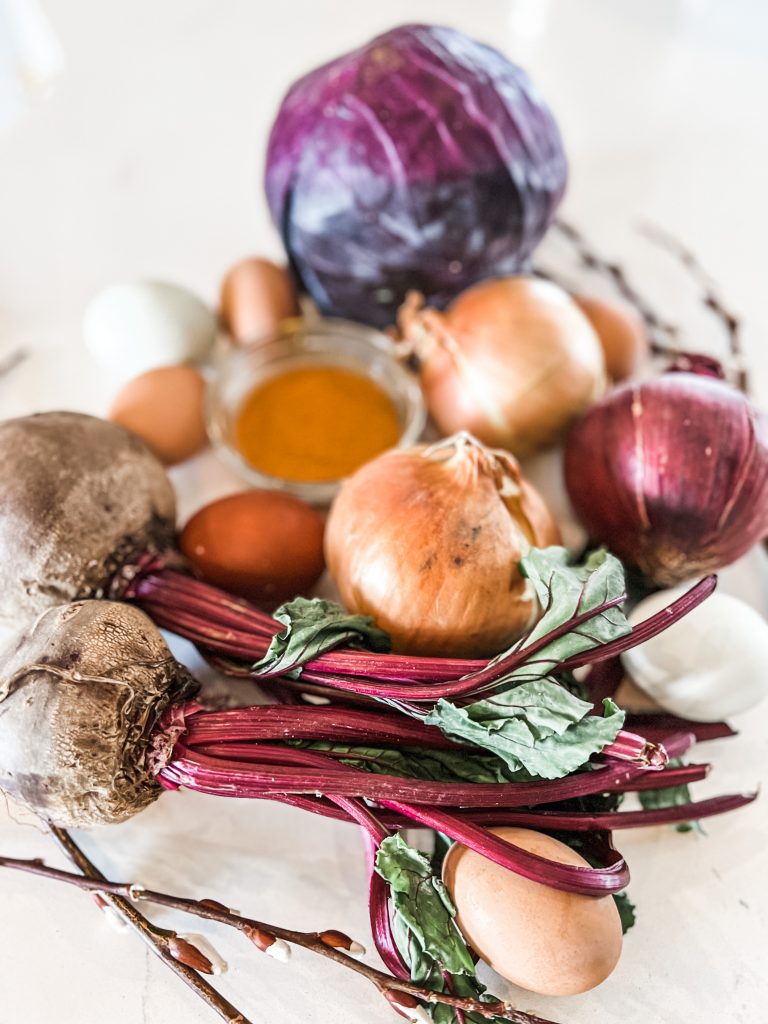
How to get those Natural Rainbow Colors
Blue, purple, pink, yellow, and other natural shades are all a possibility! Below are some examples of the variety of colors you can achieve with different fruits or vegetables when dyeing eggs naturally.
- Deep Redish/Orange: skins from 6 Yellow Onions
- Mustard Yellow: 2 tbsp Turmeric powder
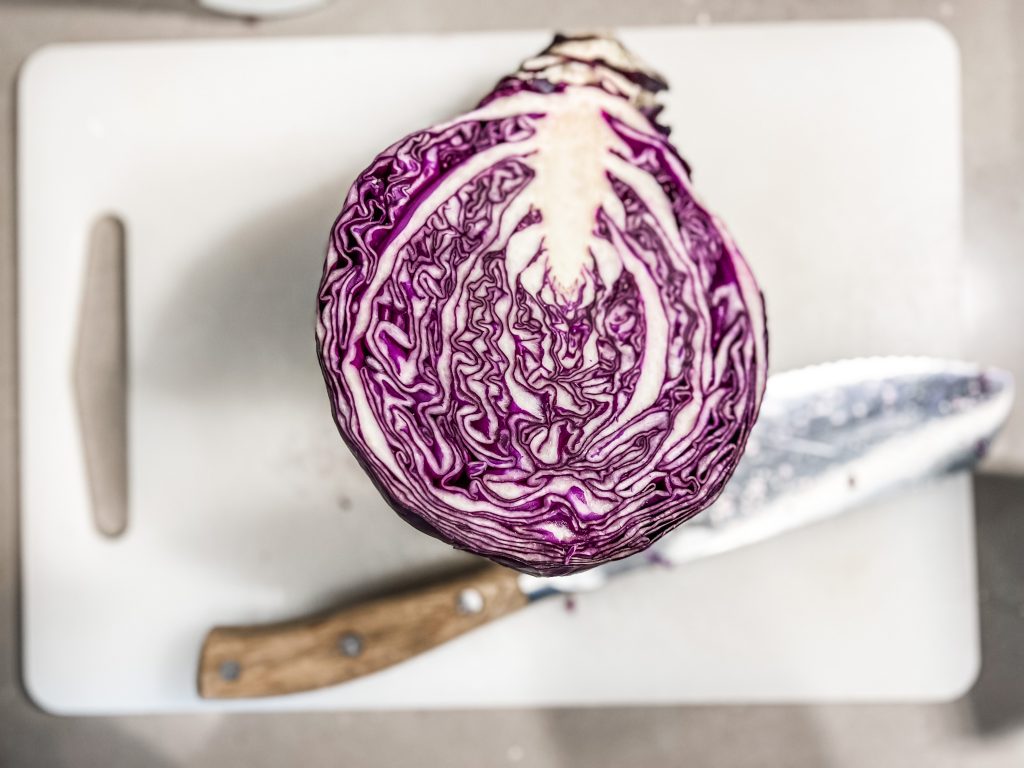
- Blue: 1/2 Red Cabbage, quartered
- Purple: 2 Beets cut in quarters, with stems
Steps to Naturally Dye Easter Eggs
- Place your choice of produce, flowers, spices, etc. into a pot on the stove
- Add the tbsp of vinegar each color-specific recipe calls for (recipe card below) and boil for about 5-10 minutes
- Strain colored water and let cool
- Place eggs in glass containers and pour cooled water over the top
- Refrigerate for at least 1 – 2 days
- Remove eggs from dye – rinse and allow to dry on a non-absorbent surface (drying rack, wax paper, etc.)
- Store in the refrigerator
How can I make sure the color sets?
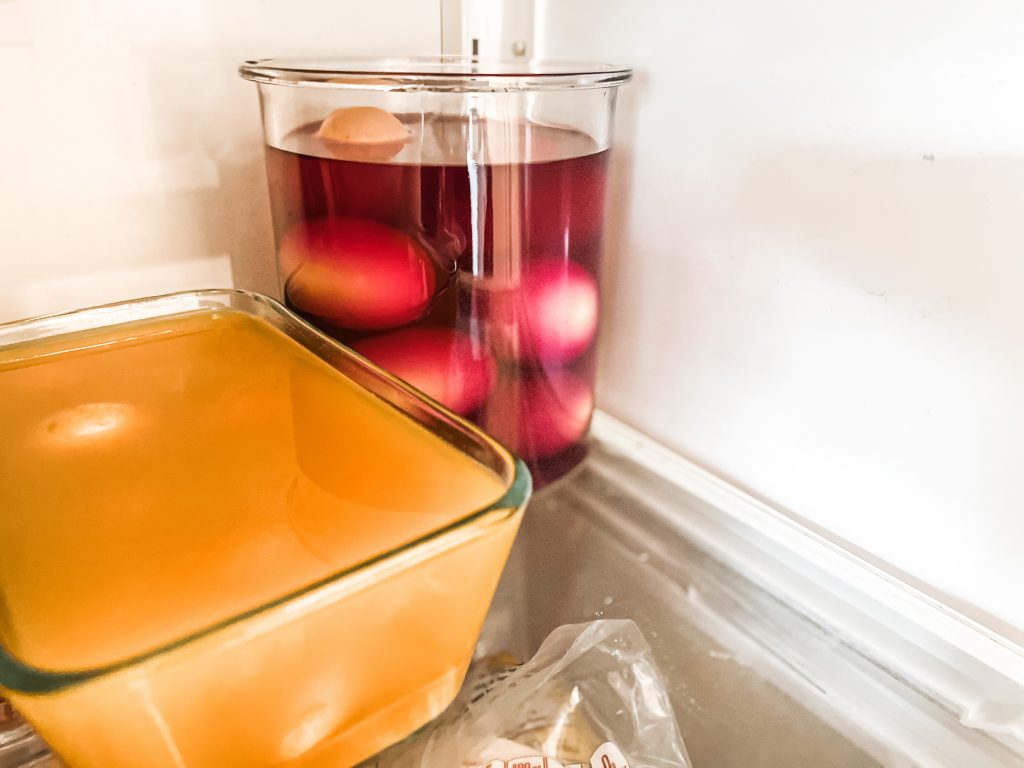
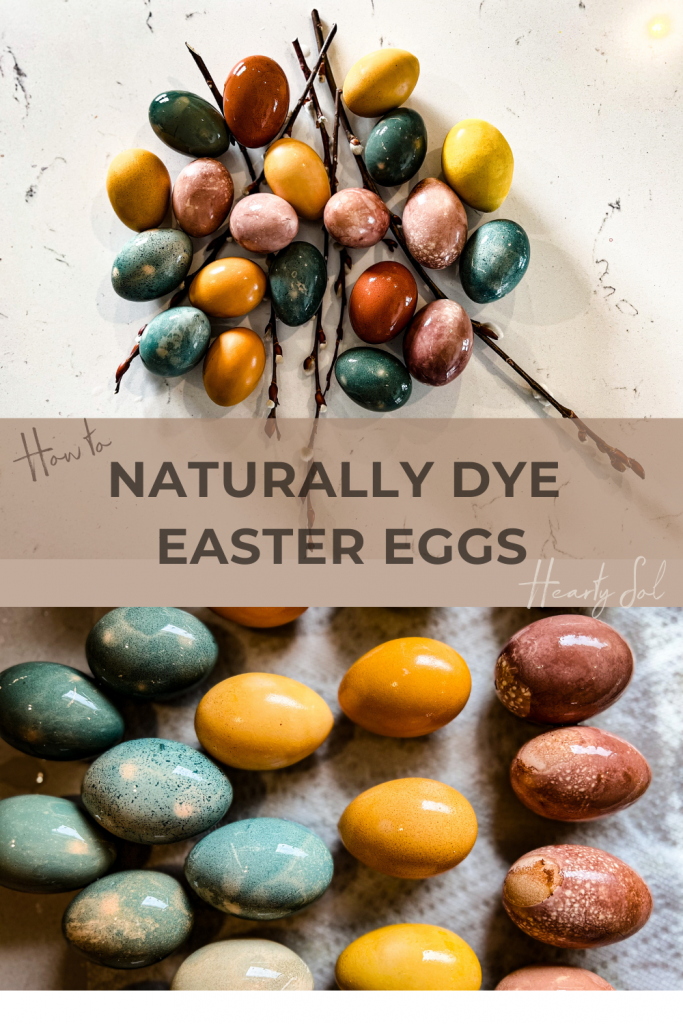
After the pots of boiling color have cooled, and the produce, flowers etc. have been strained, we like to pour them over the eggs which we place in pyrex containers. Then we set them in the fridge for a day or so to really get that dark color! You can let them sit in the natural color for as little or as long as you want – like a color marinade!
To get the color you see in this photo, we had our sit for 1 day in the fridge. We get such an array of naturally colored eggs from our chickens, so I like to leave some just natural to mix in with the dyed ones.
What are other natural ingredients I can use to dye my Easter eggs? + What I’m curious about
There is no best natural ingredient when dyeing, go and experiment with other varieties of things around your home! We have tried amaranth flowers, coffee, charcoal, grape juice, blueberries, paprika, mustard, goldenrod, oranges, carrot tops, etc!
When trying different combinations, just go with the basic recipe of about 2 Cups of Boiling Water, the natural thing you’re trying (quartered) + 2 Tbsp. of Vinegar.
Another question I’ve gotten is “how can I achieve the speckled look when dyeing my eggs?”
To this I say, each egg shell is unique, with their own speckles and maculation. This naturally dyeing process brings out these unique hallmarks. I do know that wrapping the shell in fabric or rubber bands can result in unique patterns or you may choose to transfer eggs from one color bath to another, this is something I haven’t tried yet!
How to Naturally Dye Easter Eggs: The Video
Questions People are asking about Naturally Dyeing Easter Eggs
Of course you can! I love to keep these deep brown eggs to add to the richness of the rainbow colors. If you attempt to dye them, know that it will take longer to change the color of these darker brown ones.
Absolutely. The items that we are dying our eggs with in this post are all edible food items. Feel free to nibble away at these colorful eggs!
I haven’t noticed a difference if the eggs are warm or cold. Sounds like a fun science experiment. Ours are generally cool since they have just came in from the coop, have washed, boiled in our Instant Pot and have been cooling in the fridge.
Keep them soaking for at least 1 to 2 days. The longer you leave them in the dye in the refrigerator the deeper the color will be. I left ours in for a couple of days.
These food dyes are easily removable with our homemade kitchen cleaner!
Tips for the best Naturally Dyed Eggs
- Experiment! Try different foods and see what happens. Did you ever think a yellow onion peel could turn an egg that deep redish-orange? Neither did the first person who tried it! Boil up some eggs, put on your best mad-scientist apron, and have fun!
- What can you do with all those hard-boiled eggs, except make some yummy egg salad sandwiches? Try our favorite smoked egg brine for a smoky, savory snack. Learn how to get these fresh chicken eggs to peel here!
- Allow your eggs to dry on a piece of wax paper or a drying rack to avoid a surface that will absorb the dye away from the egg like the cardboard egg carton, paper, or cloth towel.
- Using colored eggs will make the colors vary. So my tan egg dyed using yellow onion peel turns out more rose colored than orange, etc.
Printable Instruction Card
Naturally Dyed Chicken Eggs
Equipment
- 1 pot
Ingredients
Blue Eggs
- 4 C. Boiling Water
- 1/2 Cabbage (quartered)
- 2 Tbsp. Vinegar
Rose Eggs
- 2 C. Boiling Water
- 6 Red Onions (using only the peels)
- 3 tsp. Vinegar
Deep Rusty Orange Eggs
- 2 C. Boiling Water
- 6 Yellow Onions (using only the peels)
- 3 tsp. Vinegar
Mustard Yellow
- 1 C. Boiling Water
- 2 Tbsp. Turmeric
- 2 tsp. Vinegar
Instructions
- Bring water to a boil.
- Add vegetable, skins, flowers, or turmeric and vinegar. Boil for about 5-10 minutes to bring out the color.
- Strain water and let cool before pouring over top of the eggs.
- Place in the refrigerator for 1-2 days depending on how deep you would like your eggs to dye.
- Remove eggs from dye, rinse, allow to dry on a non-absorbent surface like a drying rack or wax paper.
- Store in the refrigerator.
Notes
Pin for later!
Welcoming Spring!
- 8 Easter Inspired Dishes
- How to make a Simple Spring Wreath
- Preparing to Weave with Willow
- Homemade low sugar fruit snacks

Affiliate Disclosure & Content Disclaimer
This post may contain affiliate links from a paid sponsor, Amazon or other program. When you use these links to make a purchase I earn a small commission at no extra cost to you. This allows me to continue creating the content that you love. The content in this article is created for information only and based on my research and/or opinion.
Emily T.


DAILY INSPIRATION ON THE GRAM @hearty.sol
it's hip to be square!
View comments
+ Leave a comment