

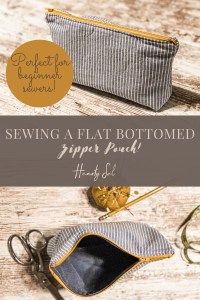
How to Sew a Flat-Bottomed Zipper Pouch | Learn to Sew Lesson #7
This tutorial for a zip pouch with a flat bottom is the seventh lesson in my ” Learn to Sew Series”. These projects are aimed at helping you learn how to sew or improve your sewing skills! These zippered pouches are my “go-to” handmade gift, and were one of the very first bags I learned how to sew. They stitch up quickly and are a great way to use up fabric scraps!
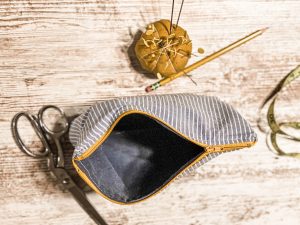
I’ve made A LOT of zippered bags over the years. I love that the pattern is simple and can easily be modified or customized depending on what you want to use the bag for! You can stitch it out of laminate fabrics to make a cosmetic bag, make it small enough to hold chapstick, or large enough to hold a hairbrush! It’s up to you.

(This post may contain affiliate links which means I make a small commission at no extra cost to you.)
You could make this big enough to hold a small outfit for carry-on purposes, an ipad, or toys! Go wild!
A few Sewing Tips Before you Begin
You can make this bag ANY size that you want. Just make sure that your zipper is longer than the width of your fabric. Customize and resize away! This bag is about 8″ x 10″ x 1 ½″
The Video Tutorial!
-You need to use a 10″ zipper for this project
-You can use a zipper that is longer than what you need, you will just cut it to size during the construction process.
-Take the time to make sure your interfacing is the same size as your fabric pieces, extra bits of interfacing hanging over the edge of the fabric may throw you off as you’re sewing.
-All seam allowances are ½″, except the zipper seam allowance, it’s ¼″
Zip Pouch with Flat Bottom Sewing Tutorial – Supplies Required
1 Fat Quarter of Fabric for Bag Outside
1 Fat Quarter of Fabric for Bag Lining
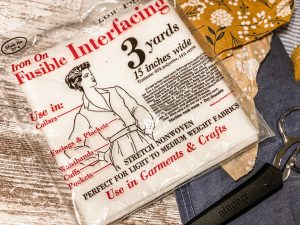
½ yard Fusible Fleece Interfacing
10″ or longer polyester zipper
Cutting Directions
For Pouch Outside Fabric Cut:
2 pieces each 8″ x 10″
2 pieces of 8″ x 10″ Fusible Interfacing
For Pouch Lining Fabric Cut:
2 pieces each 8″ x 10″
2 pieces of 8″ x 10″ Fusible Interfacing
Construction Steps
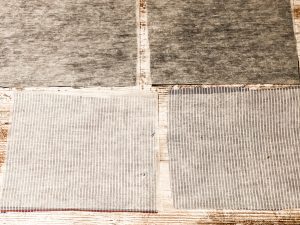
Use your iron to iron the fusible interfacing to the wrong side of both the lining and outer fabrics.

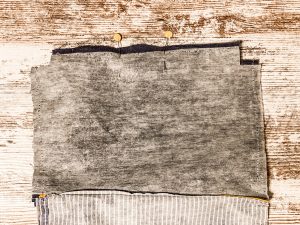
On the bottom of all 4 pieces snip out a 1″ x 1″ square. This will help us make the bottom of the pouch nice and boxy.
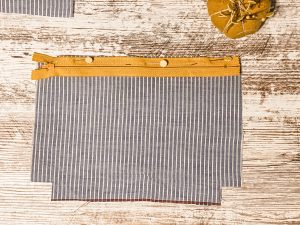
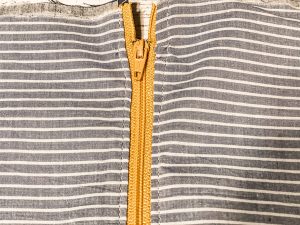
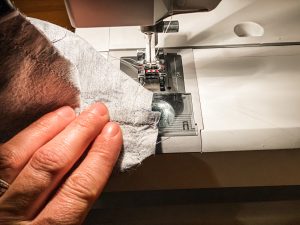
Pin the right side of the -outer fabric to the right side of the zipper, the right side of the zipper will be facing the right side of the zipper. Pin the right side of one of the lining pieces to the wrong side of the zipper. Using a zipper foot, stitch.
Repeat for the other side of the zipper.
Press the fabric away from the zipper and topstitch along both sides of the zipper.
Next, unzip the zipper ¾ of the way.

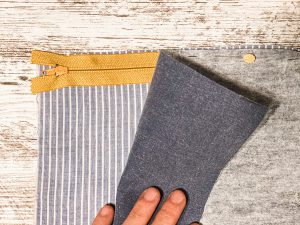
Pin the two zip pouch outside pieces right sides together and the two lining pieces right sides together. Fold the seam allowance of the zipper towards the lining pieces.
Stitch with ½″ seam allowance, skipping the corners. Leave a 2″ opening in the center of the lining pieces so that you can turn the pouch right side out.
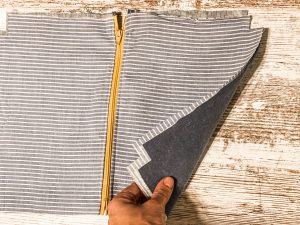
Next, pinch the corners (where the squares are cut out) so that the raw edges are even and the seams are lined up on top of each other. Stitch in place with ½″ seam allowance. Repeat for all 4 corners.
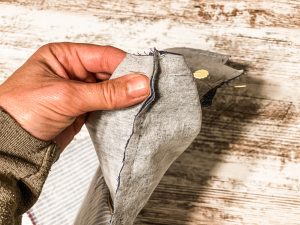
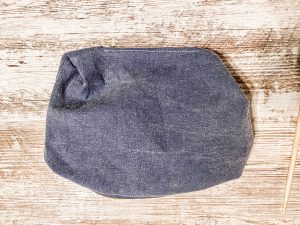
Snip any extra fabric on the corners and turn inside out through that 2″ opening. Carefully pushing out all of the corners with a chopstick or something of the like.

Finishing
Using your iron and lots of steam, press the zip pouch well, don’t skip this step, it will be one of the things that give you a nice smooth finish on your bag.
Stitch (by hand or machine it’s up to you) the opening in the lining closed.
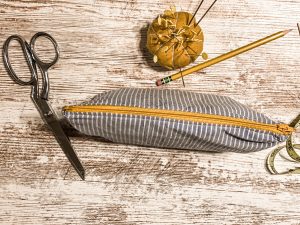
That’s it! Fill it with something special and give it to someone. OR keep that baby for all your favorite things!
PIN FOR LATER!
HEARTY SEWING PROJECTS TO INSPIRE YOU.
Sewing a Simple Spring Skirt with POCKETS
Making a Leather Apple Watch Band
WHAT ARE THE PROJECTS THAT YOU WANT TO LEARN TO MAKE? COMMENT BELOW!

Affiliate Disclosure & Content Disclaimer
This post may contain affiliate links from a paid sponsor, Amazon or other program. When you use these links to make a purchase I earn a small commission at no extra cost to you. This allows me to continue creating the content that you love. The content in this article is created for information only and based on my research and/or opinion.
Emily T.
Leave a Reply


DAILY INSPIRATION ON THE GRAM @hearty.sol
it's hip to be square!
So helpful! I am terrible with zippers! I tried to make a pouch like this once and it came out all wonky! I think I need to try again!
Just what I wanted. Thank you.
Oh my goodness I have just made this pouch with a zipper and I cannot thank you enough for your excellent tutorial and video! I have never made any bag that looks quite so professional!! It’s for a girlfriend’s birthday and I know she will just love it! X
Oh I’m so excited for you! They are just the perfect thing!
I just wanted to stop by and say I have today finished another bag and this one is very special and much bigger – based entirely on this tutorial – for my daughter who is getting married this year. It’s a zipper pouch made from her first pillow case and it is for her to keep her wedding keepsakes safe for the future years. Thank you again for the most simplest and thorough tutorial!x
Yeah! How splendid! Congratulations, too!